Learning-Raytracing-in-8-weeks | Area Lights | Part 1
Hello, this is the first article of an 4 part series where I write down what I’ve learned about Raytracing on the CPU with voxels (which is of course in C++). I have used this template to which I have added features and refactored over the span of the 8 weeks. Here is the overview:
You can see the repo of my raytracer here.
Simple Area lights
Hello, this is the first of an 8 part series where I write down what I’ve learned about Raytracing on the CPU with voxels (which is of course in C++). 
The humble Point Light
The first step towards implementing an area light is starting with something that is a bit easier. In this context, Point Lights are the perfect candidate. We cast a ray towards a voxel: if we hopefully hit something, we need to answer the binary question of whether or not we are in the shadow.

We are in light
We can cast a shadow ray from the intersection point of the ray primary towards our point light. A point light can be thought of as a position with a defined color. One function that illustrates this concept could look like this:
1
2
3
4
5
6
7
8
9
10
11
12
13
14
15
16
17
18
19
20
21
22
23
24
25
26
27
28
float3 Renderer::PointLightEvaluate(Ray& ray, Scene& scene, PointLightData lightData)
{
 //Getting the intersection point
 const float3 intersectionPoint = ray.O + ray.t * ray.D;
 const float3 dir = lightData.position - intersectionPoint;
 const float dst = length(dir);
 const float3 dirNormalized = dir / dst;

 const float3 normal = ray.GetNormal();
 //Having a negative dot product means the light is behind the point
 const float cosTheta = dot(dirNormalized, normal);
 if (cosTheta <= 0)
  return 0;
 //the formula for distance attenuation
 const float3 lightIntensity = max(0.0f, cosTheta) * lightData.color / (dst * dst);
 //materi
 float3 originRay = OffsetRay(intersectionPoint, normal);
 const float3 k = ray.GetAlbedo(scene);

 Ray shadowRay(originRay, dirNormalized);
 // we do not shoot the ray behind the light source
 shadowRay.t = dst;
 if (scene.IsOccluded(shadowRay))
  return 0;


 return lightIntensity * k;
}
I will walk you through the code, but first, let’s see how it looks:
As you can see, this code results in some hard shadows because of our “yes” or “no” answer to the shadow question. After we get all the common variables, such as the normal, intersection point for our hit, as well as the distance and direction to the point light, we compute the lambertian cosine law, which states that the intensity of light reflected off a surface is proportional to the cosine of the angle between the incident light and the surface normal, or in this case, the dot product (it’s the same thing and also faster to compute).
\[\mathbf{a} \cdot \mathbf{b} = |\mathbf{a}| \cdot |\mathbf{b}| \cdot \cos(\theta)\]
That means that in code we multiply the cosine between the normal of the point and the direction to the point light with the color of the light. We also need to divide by the distance squared. This is known as distance attenuation.
1
 const float3 lightIntensity = max(0.0f, cosTheta) * lightData.color / (dst * dst);
All that is left is to construct a shadow ray and check whether it is occluded or not. In other words, we check if there is something between our point and the light. If there is, then we are in shadow, if not, we multiply by the color of the object and by the light intensity based on the previous formula. 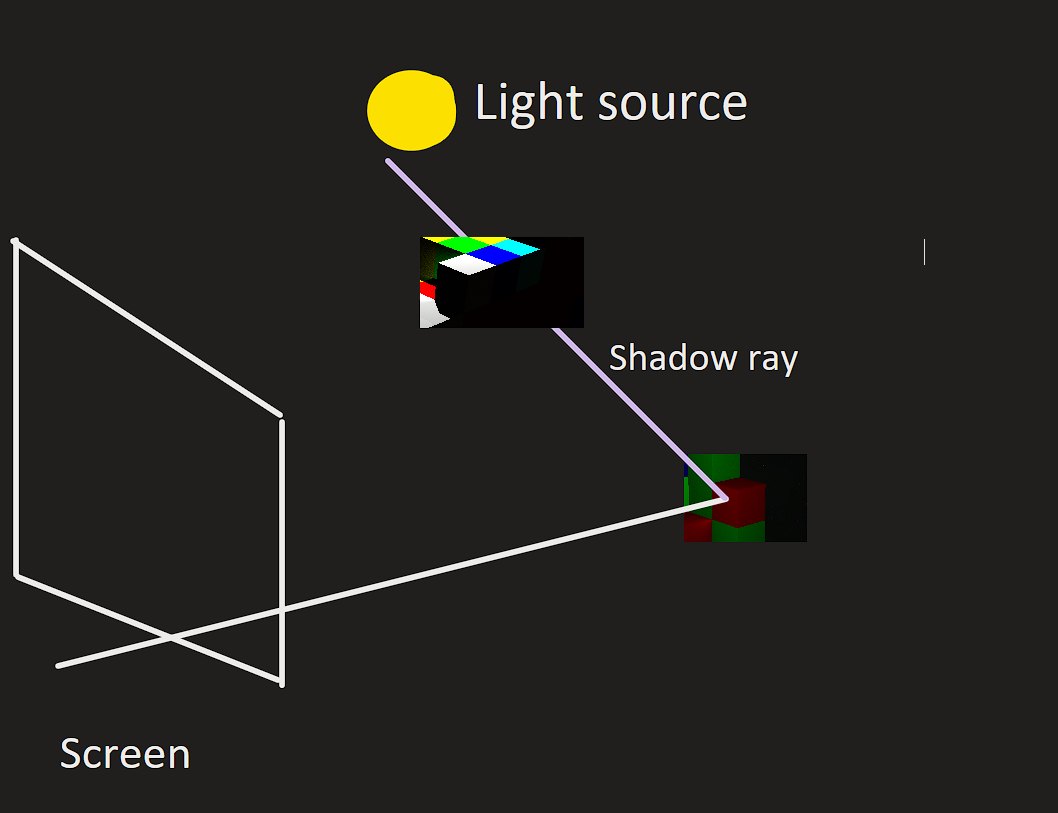
In case you want a more detailed walkthough over how point lights are defined, ogldev has a more in depth tutorial here.
How we can approximate a sphere that emits light
I am quite new to raytracing, but the simplest approach to adding an area light is to have an imaginary sphere that acts as a light source. The idea is very similar to our point light: while an area light shares a color and a position with a point light, it is different because it has a volume. For instance, a sphere would have a radius that defines its volume.
Let’s consider the following: we take a random point on the sphere and shoot a shadow ray towards it. We repeat this process for a certain number of times and add up the total light intensity, like we did with the point light. Then, we can divide by the total number of shadow rays that we fired, and we end up with a pretty good approximation of the extent to which we are in a shadow (the percentage). This method is called Monte Carlo integration. This is how a version of this in code might look like:
1
2
3
4
5
6
7
8
9
10
11
12
13
14
15
16
17
18
19
20
21
22
23
24
25
26
27
28
29
30
31
32
33
34
35
36
37
38
39
40
41
42
43
44
45

float3 Renderer::AreaLightEvaluation(Ray& ray, Scene& scene, SphereAreaLightData lightData)
{

 //the same as before, we get all the needed variables


 //we check the shadow for a number of points and then we divide by
    //the sample count to get the average
 for (int i = 0; i < numberOfSamples; i++)
 {
  float3 randomPoint = RandomDirection();

  randomPoint *= radius;
  randomPoint += center;

  const float3 dir = randomPoint - intersectionPoint;
  const float dst = length(dir);
  const float3 dirNormalized = dir / dst;
  const float cosTheta = dot(dirNormalized, normal);

//learn more about how this works here:
//https://www.physicsforums.com/threads/luminance-of-a-lambertian-sphere-formula.449703/
//basically it scales with the area
  const float3 lightIntensity = cosTheta * lightData.color * lightData.colorMultiplier * (radius * radius) *
 PI4 / (dst *
  dst);


  if (cosTheta <= 0)
  {
   continue;
  }

  Ray shadowRay(point, dirNormalized);
  shadowRay.t = dst;
  if (scene.IsOccluded(shadowRay))
   continue;
  incomingLight += lightIntensity;
 }
 incomingLight /= static_cast<float>(numberOfSamples);


 return incomingLight * k;
}
A basic accumulator
In practice, this is going to look quite noisy, but, by using an accumulator, we are going to get a better image over time. The most basic accumulator is going to average our previos screen renders, becoming more accurate over time. Here is some code:
1
2
3
4
5
6
7
8
9
10
11
12
13
14
15
16
17
18
19
20
21
22
23
24
25
26
27
28
29
30
31
32
33
34
35
void Tick(){
 for_each(execution::par, vertIterator.begin(), vertIterator.end(),
          [this](uint32_t y)
          {
           //do only once
           const uint32_t pitch = y * SCRWIDTH;
           for (uint32_t x = 0; x < SCRWIDTH; x++)
           {
           float3 totalLight{0};

     Ray primaryRay = camera.GetPrimaryRay(static_cast<float>(x) ,
              static_cast<float>(y));

     //value for this pixel
     totalLight = Trace(primaryRay, maxBounces);

           const float4 newPixel = totalLight;
           //over time our accumulator is to have more weight
            float weight = 1.0f / (static_cast<float>(numRenderedFrames) + 1.0f);
            //we accumulate
            float4 pixel = accumulator[x + pitch] * (1 - weight) + newPixel * weight;
            screen->pixels[x + pitch] = RGBF32_to_RGB8(&pixel);
            accumulator[x + pitch] = pixel;
           }
          });

 //increase number of frames
 numRenderedFrames++;

 //Reset number of frames to 0 if we changed something in the scene
 if (camera.HandleInput(deltaTime))
 {
  numRenderedFrames = 0;
 }
}
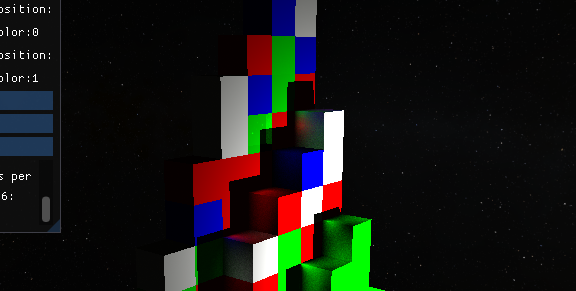
For a slightly longer and visual explanation of an accumulator, watch Sebastian Lague’s Raytracing segment.  We have soft shadows now!
What are we actually doing?
Formally, what we have done can be defined in the following way:
\[\int_{\Omega} L(\mathbf{x}, \omega) \cos(\theta) \, d\omega \approx \frac{1}{N} \sum_{i=1}^{N} \frac{L(\mathbf{x}, \omega_i) \cos(\theta_i)}{p(\omega_i)}\] \[\begin{align*} &\text{Legend:} \\ &- \Omega: \text{Solid angle subtended by the area light sphere.} \\ &- L(\mathbf{x}, \omega): \text{Radiance of the area light at point } \mathbf{x} \text{ in direction } \omega. \\ &- \theta: \text{Angle between the surface normal and the direction vector.} \\ &- \omega: \text{Direction vector.} \\ &- p(\omega): \text{Probability density function for sampling directions } \omega. \\ &- N: \text{Number of Monte Carlo samples.} \end{align*}\]I hope the legend is helpful
At first, this may seem daunting, however, in computer graphics, we do not solve integrals analytically (most of the time I suppose), but we are trying to solve them numerically. In other words, we try to approximate until we get a result that is very close to reality. This is why we initially got so much noise in the image; over time, we will get less and less noise. For a much better explanation of this topic, you can click on this article by Jacco Bikker.
Thanks for reading my article. If you have any feedback or questions, please feel free to share them in the comments or email me.
![]()